Spring Boot Microservices Tutorial - Part 5
In Part 5 of this Spring Boot Microservices Tutorial series, we will document our REST APIs using Springdoc Open API and Swagger.
What is Open API?
Open API (don't mistake it with Open AI :D )is a specification that defines a standard way to document the APIs. No matter which programming language or framework you use, Open AI provides a standard way of defining and documenting your API so that it's easy to read and use the API.
In the Java world, it's similar to the Java Persistence API (JPA) that defines a specification on how to persist data in our applications. Hibernate is a library that implements JPA, similarly, we have a tool called Swagger, which helps us implement the OpenAPI specification.
Springdoc OpenAPI
Swagger does not provide out-of-the-box support with Spring Boot, that's where the library Springdoc OpenAPI comes in, it provides good support with Spring Boot and helps us generate the API documentation automatically in JSON/YML and HTML formats.
If you want to view the documentation in HTML format, we should add the below dependency in all our services:
go to springdoc.org → here we will get all details related to openapi
   <dependency>
      <groupId>org.springdoc</groupId>
      <artifactId>springdoc-openapi-starter-webmvc-ui</artifactId>
      <version>2.5.0</version>
   </dependency>
Make sure to check the documentation, to get the latest version of the dependency -springdoc.org/#getting-started
Next, let's customize the URL we want to serve the REST API documentation, by default, spring doc open API exposes the documentation at URL path - /swagger-ui/index.html, if we want to customize the URL path, add the below property to the application.properties file.
springdoc.swagger-ui.path=/swagger-ui.html
so the documentation of our API will be available in path
localhost:8080/swagger-ui/index.html
if any new client is onboarded we can give above url. so that client can understand out API documentation and how to work with our API.
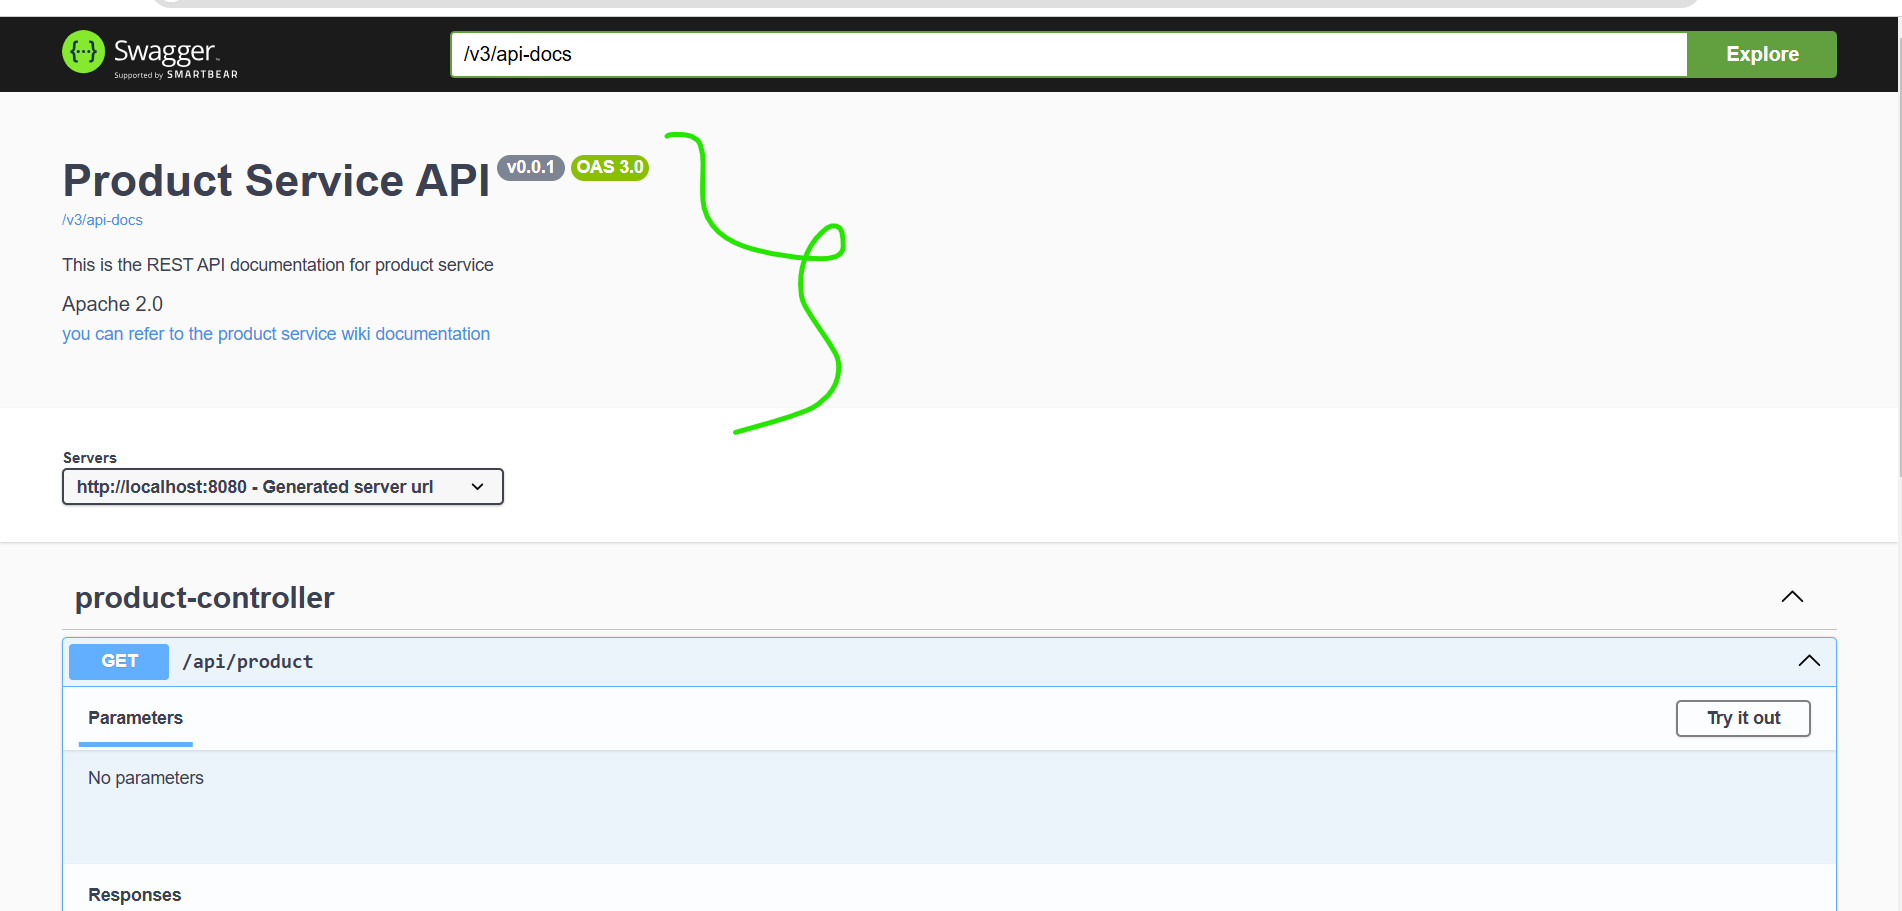
below screenshot is our product service documentation → this we can give to the newly onboarded client.

Next, we have to create a configuration class, to define some metadata(to give more information about our API in documentation) about our API. create a class called OpenAPIConfig in a package called config.
OpenAPIConfig.java
package com.techie.microservices.product.config;

import io.swagger.v3.oas.models.ExternalDocumentation;
import io.swagger.v3.oas.models.OpenAPI;
import io.swagger.v3.oas.models.info.Info;
import io.swagger.v3.oas.models.info.License;
import org.springframework.context.annotation.Bean;
import org.springframework.context.annotation.Configuration;

@Configuration
public class OpenAPIConfig {

    @Bean
    public OpenAPI productServiceAPI() {
        return new OpenAPI()
                .info(new Info().title("Product Service API")
                        .description("This is the REST API for Product Service")
                        .version("v0.0.1")
                        .license(new License().name("Apache 2.0")))
                .externalDocs(new ExternalDocumentation()
                        .description("You can refer to the Product Service Wiki Documentation")
                        .url("https://product-service-dummy-url.com/docs"));
    }
}
After adding above configurations the swagger was looking as below.

You can see the above configuration is for the ProductService application, we can create a similar configuration for the Order Service and the inventory service.
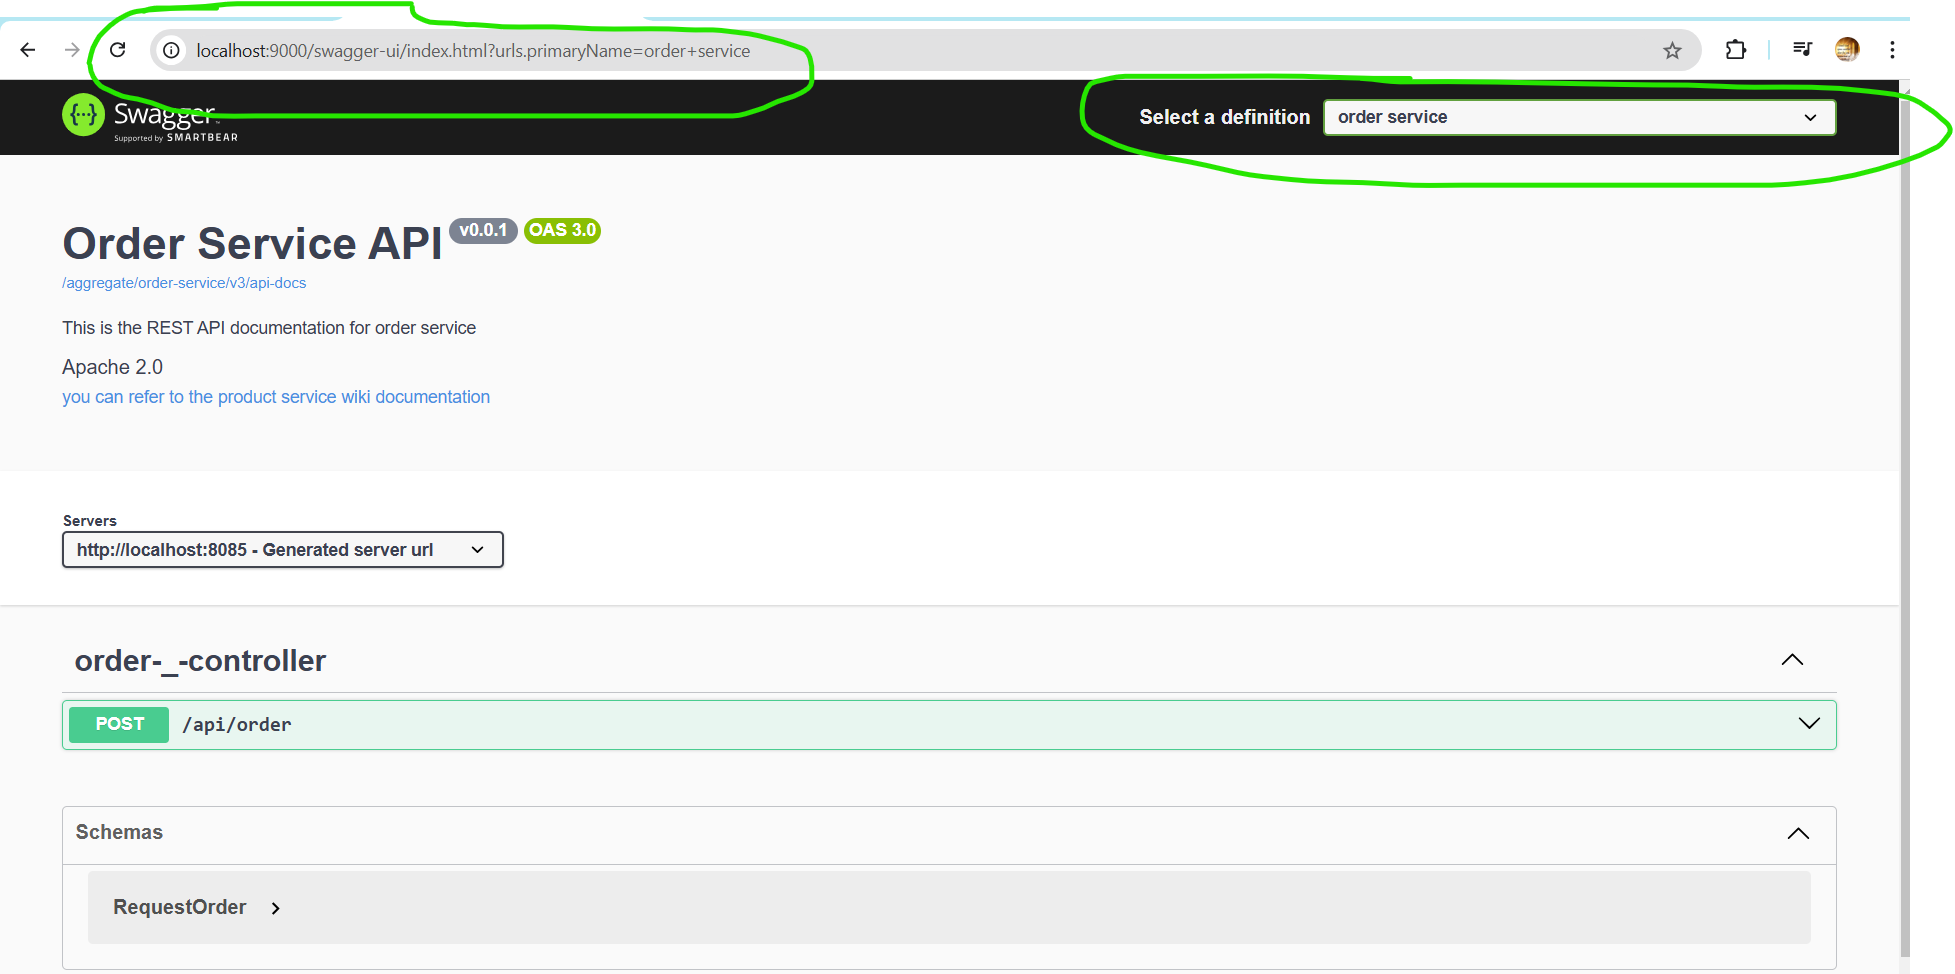
Now, let's start all the applications and go to the path /swagger-ui.html for all our 3 services, you will see the API documentation like below screenshots.
API Documentation for Product Service

API Documentation for Order Service

API Documentation for Inventory Service

Documentation in JSON/YML Format
To generate the documentation in JSON/YML format, we have to add the following dependency:
   <dependency>
      <groupId>org.springdoc</groupId>
      <artifactId>springdoc-openapi-starter-webmvc-api</artifactId>
      <version>2.5.0</version>
   </dependency>
Let's customize the path of the API documentation by adding the below property in the application.properties file
springdoc.api-docs.path=/api-docs
Now, after restarting the application, go to the URL: localhost:8080/api-docs and you should see the documentation below:
  "openapi": "3.0.1",
  "info": {
    "title": "Product Service API",
    "description": "This is the REST API for Product Service",
    "license": {
      "name": "Apache 2.0"
    },
    "version": "v0.0.1"
  },
  "externalDocs": {
    "description": "You can refer to the Product Service Wiki Documentation",
    "url": "https://product-service-dummy-url.com/docs"
  },
  "servers": [
    {
      "url": "http://localhost:8080",
      "description": "Generated server url"
    }
  ],
  "paths": {
    "/api/product": {
      "get": {
        "tags": [
          "product-controller"
        ],
        "operationId": "getAllProducts",
        "responses": {
          "200": {
            "description": "OK",
            "content": {
              "*/*": {
                "schema": {
                  "type": "array",
                  "items": {
                    "$ref": "#/components/schemas/ProductResponse"
                  }
                }
              }
            }
          }
        }
      },
      "post": {
        "tags": [
          "product-controller"
        ],
        "operationId": "createProduct",
        "requestBody": {
          "content": {
            "application/json": {
              "schema": {
                "$ref": "#/components/schemas/ProductRequest"
              }
            }
          },
          "required": true
        },
        "responses": {
          "201": {
            "description": "Created",
            "content": {
              "*/*": {
                "schema": {
                  "$ref": "#/components/schemas/ProductResponse"
                }
              }
            }
          }
        }
      }
    }
  },
  "components": {
    "schemas": {
      "ProductRequest": {
        "type": "object",
        "properties": {
          "id": {
            "type": "string"
          },
          "name": {
            "type": "string"
          },
          "description": {
            "type": "string"
          },
          "price": {
            "type": "number"
          }
        }
      },
      "ProductResponse": {
        "type": "object",
        "properties": {
          "id": {
            "type": "string"
          },
          "name": {
            "type": "string"
          },
          "description": {
            "type": "string"
          },
          "price": {
            "type": "number"
          }
        }
      }
    }
  }
}

Aggregating the documentation in API Gateway
You may have observed that to access the documentation we have to manually visit the URL of each service, we can aggregate all the documentation and expose it in a single place in the API Gateway.
To do that add the below dependencies to the pom.xml of the API Gateway service.
        <dependency>
            <groupId>org.springdoc</groupId>
            <artifactId>springdoc-openapi-starter-webmvc-ui</artifactId>
            <version>2.5.0</version>
        </dependency>
        <dependency>
            <groupId>org.springdoc</groupId>
            <artifactId>springdoc-openapi-starter-webmvc-api</artifactId>
            <version>2.5.0</version>
        </dependency>
Next, let's add the below properties to aggregate the URLs of all the 3 services.
springdoc.swagger-ui.path=/swagger-ui.html
springdoc.api-docs.path=/api-docs
springdoc.swagger-ui.enabled=true
springdoc.api-docs.enabled=true
springdoc.swagger-ui.urls[0].name=product service
springdoc.swagger-ui.urls[0].url=/aggregate/product-service/v3/api-docs
springdoc.swagger-ui.urls[1].name=order service
springdoc.swagger-ui.urls[1].url=/aggregate/order-service/v3/api-docs
springdoc.swagger-ui.urls[2].name=inventory service
springdoc.swagger-ui.urls[2].url=/aggregate/inventory-service/v3/api-docs
We defined each service with a separate URL, whenever the user visits this URL, we have to route this request to the appropriate service, and for that, we need to add the corresponding routes in the Routes.java class.
Breakdown of Properties:
springdoc.swagger-ui.path=/swagger-ui.htmlSpecifies the path where the Swagger UI can be accessed.
Default:
/swagger-ui.html. You can customize this to any other path, e.g.,/docs.
springdoc.api-docs.path=/api-docsSpecifies the path for the OpenAPI specification (JSON) endpoint.
Default:
/v3/api-docs. Customizing it to/api-docs.
springdoc.swagger-ui.urlsPurpose: Configures multiple OpenAPI definitions (from different microservices) to be displayed in the Swagger UI.
Each
urlentry corresponds to a service.
Individual URLs:
springdoc.swagger-ui.urls[0].name=product servicename: Label shown in the Swagger UI dropdown for this API.url: Specifies the location of the OpenAPI documentation for the Product Service (via the API Gateway).- Path:
/aggregate/product-service/v3/api-docs.
- Path:
springdoc.swagger-ui.urls[1].name=order serviceFor the Order Service documentation.
Path:
/aggregate/order-service/v3/api-docs.
springdoc.swagger-ui.urls[2].name=inventory serviceFor the Inventory Service documentation.
Path:
/aggregate/inventory-service/v3/api-docs.
Routes.java
@Bean
    public RouterFunction<ServerResponse> productServiceSwaggerRoute() {
        return GatewayRouterFunctions.route("product_service_swagger")
                .route(RequestPredicates.path("/aggregate/product-service/v3/api-docs"), HandlerFunctions.http("http://localhost:8080"))
                .filter(setPath("/api-docs"))
                .build();
    }

@Bean
    public RouterFunction<ServerResponse> orderServiceSwaggerRoute() {
        return GatewayRouterFunctions.route("order_service_swagger")
                .route(RequestPredicates.path("/aggregate/order-service/v3/api-docs"), HandlerFunctions.http("http://localhost:8081"))
                .filter(setPath("/api-docs"))
                .build();
    }

@Bean
    public RouterFunction<ServerResponse> inventoryServiceSwaggerRoute() {
        return GatewayRouterFunctions.route("inventory_service_swagger")
                .route(RequestPredicates.path("/aggregate/inventory-service/v3/api-docs"), HandlerFunctions.http("http://localhost:8082"))
                .filter(setPath("/api-docs"))
                .build();
    }
The above configuration will route all the incoming requests to the /api-docs path of the corresponding service. Note that, we previously exposed the path /api-docs to serve the documentation in the JSON format.
After adding Routers we can run api-gateway service and check. we will get 401 unauthorized error. because we defined security already. so we need to make changes to allow some urls.

Next, we have to add the security configuration to make sure that API Gateway allows the requests without authentication.
package com.programming.techie.gateway.config;

import org.springframework.context.annotation.Bean;
import org.springframework.context.annotation.Configuration;
import org.springframework.security.config.Customizer;
import org.springframework.security.config.annotation.web.builders.HttpSecurity;
import org.springframework.security.web.SecurityFilterChain;
import org.springframework.web.cors.CorsConfiguration;
import org.springframework.web.cors.CorsConfigurationSource;
import org.springframework.web.cors.UrlBasedCorsConfigurationSource;

import java.util.Arrays;
import java.util.List;

@Configuration
public class SecurityConfig {

    private final String[] freeResourceUrls = {"/swagger-ui.html", "/swagger-ui/**", "/v3/api-docs/**", "/swagger-resources/**", "/aggregate/**"};

    @Bean
    public SecurityFilterChain securityFilterChain(HttpSecurity httpSecurity) throws Exception {
        return httpSecurity.authorizeHttpRequests(authorize -> authorize
                        .requestMatchers(freeResourceUrls).permitAll()
                        .anyRequest().authenticated())
                .cors(corsConfigurer -> corsConfigurer.configurationSource(corsConfigurationSource()))
                .oauth2ResourceServer(oauth2 -> oauth2.jwt(Customizer.withDefaults()))
                .build();
    }


}
In the above configuration, we have defined a variable called freeResourceUrls, where we should permit all the requests to these paths. To allow the calls to the downstream microservices, we added the path /aggregate/ that covers the path for all the 3 services:
/aggregate/product-service/v3/api-docs
/aggregate/inventory-service/v3/api-docs
/aggregate/order-service/v3/api-docs
After running we can see below in browser.

Lastly, now let's run all the services, and go to the URL- localhost:9000/swagger-ui.html, and on the top right corner you should see a dropdown where you can switch between different API documentation of the services.

And this spring cloud openFeign is not managable now. in our project we configured openFeign , now we have to migrate it from openFeign to HttpClient.

in above we have to remove FeignClient configurations and add RestClient.
In Order_Service modify InventoryClient Interface like below.
package com.lakshmiTech.microservices.Order.Order_Service.client;

import org.springframework.web.bind.annotation.RequestParam;
import org.springframework.web.service.annotation.GetExchange;

public interface InventoryClient {

    @GetExchange("/api/inventory")
    boolean isInStock(@RequestParam String skuCode, @RequestParam Integer quantity);
}
And write RestClientConfig class as below.
package com.lakshmiTech.microservices.Order.Order_Service.config;


import com.lakshmiTech.microservices.Order.Order_Service.client.InventoryClient;
import org.springframework.beans.factory.annotation.Value;
import org.springframework.context.annotation.Bean;
import org.springframework.context.annotation.Configuration;
import org.springframework.web.client.RestClient;
import org.springframework.web.client.support.RestClientAdapter;
import org.springframework.web.service.invoker.HttpServiceProxyFactory;

@Configuration
public class RestClientConfig {

    @Value("${inventory.url}")
    private String inventoryServiceUrl;

    @Bean
    public InventoryClient inventoryClient(){
        RestClient restClient = RestClient.builder()
                .baseUrl(inventoryServiceUrl).build();
        var restClientAdapter = RestClientAdapter.create(restClient);
        var httpServiceProxyFactory = HttpServiceProxyFactory.builderFor(restClientAdapter).build();

       return httpServiceProxyFactory.createClient(InventoryClient.class);
    }
}
After this re run application and check in postman.

its working perfectly. and we need to add AUthorization also amd add access token to generate above response.

In Next tutorial we can see about Circuit breaker pattern and what is use of Circuit breaker pattern.